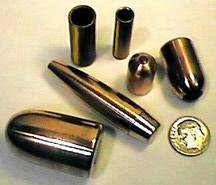
Lead, gas-checked, or Base GuardTM bullets can be made in one die (LSWC-1). Jacketed semi-wadcutters can be made in two dies (JSWC-2). Other bullets can be made in from three to five dies:
|
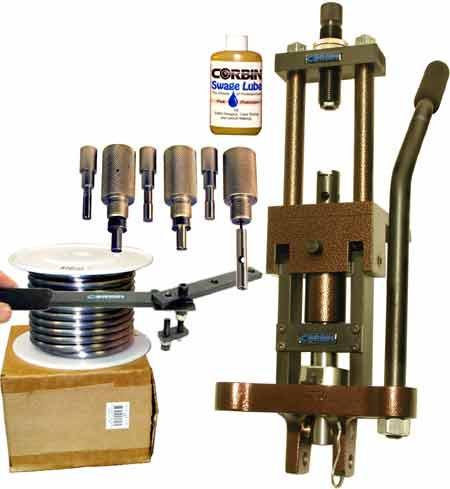
Complete Kit for making most jacketed or lead rifle and handgun bullets consists of these items:
|  |
|  |
| For comprehensive instructions about bullet swaging, you may wish to read the Corbin Handbook of Bullet Swaging, No.9. It is available for $9.50 (CD-ROM) on the Corbin Web Store. | 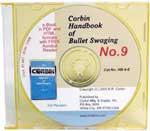 |
CORE SWAGING
 Core Swaging is the first actual swaging step when you want to prepare a highly accurate bullet weight (you can skip it if you are not concerned about extremely close weight control, and just use a cast or cut lead core without core swaging). The core swage die accepts a piece of lead that is small enough in diameter to fit easily inside the die bore, but not so long that it sticks out of the die mouth! This means you need to get the lead into a form that fits inside the die before you swage it. How do you do that?
 The best way to make the lead core (or the filling for the bullet) is to snip it from a spool of lead wire. Corbin offers lead wire in 10-pound rolls (70,000 grains) in sizes from .125 inch to .390 inch. Since the lead fits inside the core swage die, and is then expanded slightly to fit inside the bullet jacket (which itself is expanded to final diameter in the core seating operation), cores are much smaller than the final caliber of the bullet. For example, a jacketed .224 bullet will use a .185-inch diameter core with most bullet jackets. Very thick walled jackets would leave a smaller inside diameter and require smaller wire and a smaller core swage die as well. Bear in mind that you can make jackets from almost any thickness of copper, brass, or aluminum tubing, or draw them from copper strip, or buy them ready-made. The jacket wall thickness and taper controls the diameter of the core. You MUST use a core diameter that drops easily into the jacket, to avoid trapping air inside.
If you use lead wire, you will want a CORE CUTTER. Corbin makes two types, the Precision Core Cutter Model PCS-1, and the Magnum Core Cutter, Model PCS-2.
The PCS-1 is your best choice from .125 to .365 inch diameter. The PCS-2 cuts wire up to 1/2-inch diameter, but is most commonly used for cutting .390 diameter lead. To use either device, mount the cutter to your loading bench, or to a piece of 2 X 4 about four inches long which can then be gripped by a bench vise. Feed lead wire straight down into the top of the cutter with gentle hand pressure. Move the handle back and forth in a short arc to cut the cores. An adjustment screw located beneath the cutter dies should be set for the desired length (and thus weight) of core. To set it, simply cut a piece and weigh it, then adjust longer or shorter to get approximately the right weight plus a few grains for swaging. Save a sample core to quickly set the machine next time (write the weight on the core with a permanent market pen). Then you can slip the cut core into the dies and adjust the stop screw until it holds the core up against the bottom of the slightly opened cutter's top bar. Both cutters use removable, hardened dies. The PCS-1 comes with a set of dies (two for each caliber, top and bottom) for all the standard calibers up to .458 and down to .172. The PCS-2 comes with one pair of dies for a single diameter of wire, and you can order other sets made to order or from stock sizes.
If you have lots of available scrap lead, and if it is soft enough to be swaged with the kind of dies and press you have, you can cast cores quickly and easily using a CORBIN CORE MOULD.
The CM-4 makes four cores of adjustable weight at one time, in the diameter range of .185 to .365 (.224 to .458 caliber, with typical jackets). The CM-3 is a larger mould that makes either very long heavy cores in the same diameters as the CM-4, or makes up to half-inch diameter. It is most commonly ordered in .390-inch diameter, for lead paper-patched .45 caliber bullets or for jacketed .50 caliber bullets. Because the moulds are designed like a car engine with pistons and cylinders, instead of like a split bullet mould, you can pour, move the long sprue cutter, push a bar to eject the cores, close the handle and pour again in seconds. It is easy to get 1000 or more cores per hour. They do not need to be perfectly formed or to a precise weight if you swage them later in the core swage or lead semi-wadcutter die.
Once you have made some cut or cast lead cores, you are ready for the core swage die. Use Corbin Swage Lube (a drop on your fingertips will do) to put a thin film of lubricant on the lead cores as you pick them up. The die fits into the RAM of any Corbin press (not the press head, as with reloading dies). This means you can simply DROP the core into the die mouth. The core will sit there waiting to be swaged. In a reloading press, the die will fit into the press head and you will need to push the core up into it, and hold it while you carefully raise the ram (and watch your fingers!). One of the big advantages of using a real swaging press instead of trying to use a reloading press for swaging is the way the die is held and operated.
Adjust the floating punch holder (the black, threaded assembly in the top of any Corbin press, used to hold the external punch) so that the external punch just contacts the lead with the ram all the way forward. Then slightly lower the ram, and give the punch holder a quarter turn or so toward the ram. Raise the ram and see if any lead is extruded from the bleed holes in the die. (In a reloading press die, the lead is extruded from a hole in the bottom punch). If so, eject the core and weigh it. Adjust the punch holder so that the core weight comes out exactly as you desire. The key to good core weight control is to make sure of these points:
- The press ram always goes "over center" or all the way up.
- The cast or cut wire cores are always a few grains heavy.
- You use the same timing for each stroke.
- You let the pressure remain for a second or so at top of stroke.
If you do this, the cores will come out within 1 percent of total core weight, better than the 2 to 5 percent accuracy of most scales. If you want to double swage the cores, you can usually get better than 1/2-percent weight tolerance. Weight tolerance is calculated by making about ten cores, weighing them all and adding their total weight, dividing by 10, and then subtracting the weight of the lightest core from this average number, and subtracting this average number from the heaviest core. This gives you the extreme variation in grains.
Divide each of the variation grains by the average weight and multiply by 100 to get percent. You will get the extremes of weight on both sides of the average in percentage. This makes much more sense than raw grains of variation, since the effect of one grain on a 50 grain bullet is 2 percent of the total and the effect on a 500 grain bullet is only 0.2 percent. You can easily ignore a 2 grain grain variation on a typical 45-70 bullet and should not ignore it for a good .224 bullet. But in percentage, you get equally comparable numbers: 1 percent is a good number, half-percent is fantastic, and 2 percent or larger is not as good as it should be.
Although swaged core are normally put into a jacket (and must be sized to fit easily inside the jacket with finger pressure alone), they can also be used to make the most accurate possible of lead bullets, or those with gas checks or Base Guards. A special kind of core swage die called a LEAD SEMI-WADCUTTER DIE (LSWC-1) forms the nose and base on a lead, gas checked, or Base Guard bullet all in one fast stroke. The precision is good, but even better would be forming the core first, then using the CORE SEATING die to finish it. This is because the core swage die must allow some pressure to escape in order to push the lead extrusions out, limiting the internal pressure available to form the nose and base to precise shape. The core seating die has no bleed holes: it cannot adjust the core weight, but it can apply a more even pressure on the base and nose, since none is escaping during the operation. You can take your pick between higher precision or higher speed of operation.

CORE SEATING
 The core seating operation can either finish the bullet (if it is a semi-wadcutter or wadcutter type), or prepare it for the final point forming operation by expanding the lead core AND the jacket together. Bullet jackets are always under-sized for the caliber. A .308 bullet would use a jacket that starts out .306-7 inch diameter. The high internal pressure applied to the lead core evenly expands the jacket to within 0.0002 inches of final diameter. The final bit is achieved during the point forming operation. In swaging, you always increase the diameter with each step. Attempting to swage "down" is wrong and will result in stuck bullets, hard ejection, improper final diameters, and often broken punches or dies. You can DRAW down using an open, ring die where the pressure is applied in a narrow ring at one tiny section as the part is pushed through and out the top. But you cannot swage down in a closed pressure vessel without seriously compromising the operation. Always swage UP.
A core seating die looks just like a core swage die except that it has no bleed holes and is large enough to accept the jacket, not just the core. Whereas the core swage has two punches fitted closely to the die bore, the core seating die has one that must be a close fit (the internal punch), but the other (external) can fit the inside of the jacket, or it can fit the die bore, depending on what you want to do. Often you will want more than one external core seating punch, to make hollow points, lead tips, open tips, and various weight ranges. Some bullet jackets are tapered inside: the external core seating punch seals the pressure, either inside the jacket by coming firmly against the jacket inside wall at the point where the lead is compressed to its maximum, or against the die bore if the lead core is longer than the selected jacket. Depending on the jacket thickness and taper, and where you want the core to be when it is finished, you may need different diameters of external core seating punches. The key is that the punch must prevent lead from leaking past it, at the desired core length and weight, with the jacket selected, and with the style of bullet you want to make. All that matters is that the punch seals the pressure. A given core seating punch diameter is made to fit a certain jacket thickness at a certain core weight (or height inside the jacket). This is because most jackets taper inside, getting thicker toward the base. If you use a core seating punch that is too small for the combination of jacket thickness and core height, lead will bleed around it and pressure cannot build up as high as it may need to be, in order to expand the jacket correctly. You can have undersized or wrinkled jackets in the following operations as a result.
If the core seating punch is correctly sized, or if you adjust the bullet weight downward (so the core fits lower in the taper of the jacket and the walls are thicker at the point of seating), then the punch will nearly or actually touch the jacket inside diameter just as the core is compressed to the maximum possible degree. This seals the lead between the punch tip and the jacket wall even after the jacket has slightly expanded to fit the die. Pressure can be as high as it needs to be without forcing the lead core to flow up and around the punch. Of course, you would use only the minimum pressure or force needed to expand the jacket.
You can tell when this is right, because the jacket will try to stay in the die just prior to being ejected, instead of coming out with the punch. Approach this point just as you would when loading a cartridge: start with low pressure and slowly test and increase the adjustment of the external punch toward the die, so that you build pressure little at a time until the right adjustment is found. Don't swing the handle all the way with some random adjustment! This could pop the die like a ripe melon, by creating hundreds of thousands of pounds of internal pressure as the press ram and linkage line up at the end of the stroke without regard to where the end of the punch and start of the lead core align.
If the core seating punch is too large for the jacket walls or depth of the seated core (in other words, perhaps the core is too short and light for the given punch and jacket combination) then the punch will contact the jacket walls before it presses firmly enough on the core. This can cause the punch to plow up jacket material, weakening the jacket (which could be used to advantage in some designs). But it can also shorten and compress the jacket, causing wrinkling, failure to generate sufficient pressure to expand the lower part of the jacket, and thus perhaps causing undersized bullets "down the line" as you form up the nose section.
Normally you can use one diameter of punch for a moderate range of bullet weights and some slight variations in jacket wall thickness. But if you change from a commercial drawn jacket with typical internal taper to a thicker and straight walled copper tubing jacket, you will probably need a much smaller diameter core seating punch, and perhaps a smaller core swage die, which in turn may require smaller lead cores or wire diameter! Fortunately, if you tell us what you want to do in advance, we can figure out the right diameters and combinations to make it happen effortlessly on your part. You do have to use the punch, core swage die, wire or core size, and jacket wall thickness combination for which the set was designed, or else return the set along with samples of your newly-found materials so we can make whatever new parts are required to make it work again with those supplies. Whenever we make modifications or add parts to help you use different jackets or materials, we need the whole set of dies back along with enough samples of the new jacket or materials so that we can do exactly what you plan to do: make a few bullets. Then we can actually test, adjust, test again, and guarantee that the set will once again work perfectly with the new materials (as well as the old ones, since you'd still have the original parts to use). This is very handy when you are making copper tubing jackets, for instrance, because tubing can vary in thickness or diameter from one vendor to another, even if they say it is the same nominal size. Some variations work, and some cause sticking or wrinkling problems which are easily solved if we have everything back to work with plus your sample new materials in enough supply to make 20 or more bullets or jackets.
We can run into problems if you only send part of a set, or nothing at all except a request to "make it work with my new material". That's a bit like taking the carbuerator off your car, taking it back to the dealership, and asking them to give your car a tune-up! Swaging is easy and fast, but making it that way requires the whole package, not bits and pieces of it. It all works as a team: one die, punch, or component that isn't doing its part can make the whole set fail in ways that may be difficult to determine over the phone or with just a few sample bullets to study. If you have any problems, it is always best to call first, and see if we know that it is from your description, but be prepared to send the complete set with samples of your jackets, cores, seated cores, and finished bullets so we can see what you are doing at every step of the way and how the parts are coming out. That way, you have 100% chance of a fast cure for anything that ails the operation!
Since you will be using between 15,000 and 50,000 pounds per square inch with most swaging operations, the force on the punch and dies is much higher than anything else encountered in reloading, including case sizing. In fact, the pressure in the gun's chamber when you pull the trigger is often the same or less than the pressure that is contained by the diamond-lapped, heat-treated bullet swage die! At these pressures, the metals used for making the bullet flow like thick putty. The jacket expands like a balloon skin, stopped only by the sturdy die walls and punch ends. The lead is intimately formed to the jacket as it pushes the jacket to the limits of the die cavity, filling every crevice and niche. This takes place in the time it takes to move the press handle up and back. With the Corbin swaging presses, the core and jacket combo is ejected on the back stroke. With a reloading press, you must pick up a mallet and tap on a plunger to eject the bullet. This is another reason why using a real swaging press is nearly 300 percent faster than using a reloading press.
If you want to make a bullet that has a jacket right up to the start of the nose, and then the nose is made entirely from the lead core, you might be done! Just select an external punch with a cavity the shape of the nose you want on the bullet, and make sure that enough lead projects from the bullet jacket so it will completely fill this cavity. (Less than sufficient lead core will let the punch come down against the edge of the jacket, crumpling the jacket and possibly damaging the edge of the punch if you do it often enough).
A jacketed Keith pistol bullet is one example that can be made in just a core seat die (or, a core swage and core seat combination). The nose shape does not matter: it can be round, conical, or a flat wadcutter, a deep cavity or even a post. The important point is that the jacket edge cannot magically jump over the edge of the punch. The two must be kept apart by having enough lead to fill in the space between the punch and the jacket. To make a nice smooth "rifle" style ogive, you need one more die: the point forming die. It does not use a punch to form the nose. Instead, the die itself is shaped like the bullet you want to make. This eliminates the shoulder or edge on the punch, and lets the jacket smoothly slip around the curve of the die.
The standard nose shapes that are available as SWC punch cavities are:
- Keith (Truncated Conical)
- Conical (comes to a point)
- 3/4-E Ogive (our standard RN style for handguns)
- 1-E Ogive (our standard RN style for rifles)
- Target Wadcutter (flat across the face, with depressed ring)
- Button Nose Wadcutter (very small raised flat nose)
Other shapes are available on custom order. Standard shape punches are $20 in type -M, -R, or -S styles and $50 for type -H dies. If you specify the shape, depth, or other dimensions, it is a custom punch made to your order and is $70 in type -R, -M or -S, and $100 in type -H. The tooling and extra labor cost of $50 per custom made punch helps defray the time used in making special reamers and laps to form the custom shaped cavity. Standard shapes which are NOT cavities include the Hollow Point, Hollow Base, Cup Base, Dish Base, and Flat Base. Dish base is the most shallow, barely a curve toward the center of the bullet from edge to edge. Cup base has a flat margin on both sides, then curves inward less than a caliber in depth (usually only a half caliber or less). The Hollow Base typically curves in sharply to a caliber or more in depth. Specification of the exact depth, angle, tip flatness or other dimensions is a custom punch, whereas taking what is available from stock is a standard punch.
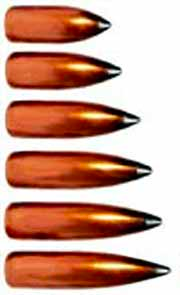
POINT FORMING
 The point forming die can be the final step in making a jacketed bullet, or you can follow it with a lead tip former for small lead tips on rifle bullets. Big blunt tips may not require a lead tip die. Open tips, where the jacket is longer than the lead core, or the so-called protected or flush tip where the jacket and core are exactly even at the tip, can be made without any further operations.
The point forming die has a cavity shaped like the bullet you want to make. You can push the seated core into this die as far as you wish, or you can stop short of using the whole die. If you do, you can control the tip size and opening. A large flat or blunt tip can be made simply by adjustment of the punch holder, so that the bullet doesn't go all the way into the die. A sharper tip can be made by adjusting it further inside with the punch holder position. The smallest tip diameter is the size of the ejection pin wire used to push the bullet out of the die by its nose. If you try to make the tip smaller, it will simply flow up the ejection pin hole and make a little pipe on the end of the bullet. The practical limit for tip diameter is the point where the ejection pin bends frequently and cannot handle the load of pushing the bullet out of the die on those rare times when you forget to use lubricant or experiment with the wrong lubricant (and thus increase the ejection pressure beyond the limit of the pin). Corbin's Handbook of Bullet Swaging goes into great detail about accuracy, tip size, diameters, misconceptions and myths that abound in the firearms field. Before you decide that a certain tip size or diameter of bullet or shape is the answer to a benchrest shooter's prayers, you owe it to yourself to at least consider the information presented here from over two decades of constant experimental work. Some of the results may surprise you, and save you a lot of money that would otherwise be wasted re-inventing a rather square wheel!
Point forming dies give the bullet its final shape and diameter. They are never made or used alone. They are carefully matched to their companion core seating die. The two are inseparable, a set fitted and matched with the utmost care and precision. You can order a point forming die by itself, but unless you sent a dozen or more sample seated cores to be used in adjusting and certifying it, or the core seating die to be mated with it, the die probably will only cause you frustration. A point forming die by itself is a Martini with the gin left out; it is a wheel without spokes, a baseball game without a pitcher. Who knows what size of bullet it will make, or whether it makes any bullet at all? Maybe it will simply swallow the first seated core shoved into it and refuse to let go! We are dealing with pressures that are not encountered in most everyday events, remember. And the precision here is far greater than required for reloading dies or even rifle chambers. The core seater and point former are a pair, and must be used as such.
The seated core from the core seat die should be within 0.0002 inches less than the diameter of the final bullet, and the bore of the point forming die takes into account the desired amount of expansion and material spring-back. The point forming die bore is seldom the diameter of the bullet. It is determined by experimentation using the exact material you plan to use (or, if you order from Corbin, the die is made to use with jackets we provide or jacket-makers and material we have designated to go with them). We can build a set of dies for any jacket you wish to provide, but we must have enough of them to test and adjust, at least a dozen and better still two dozen. Every die set is hand made and hand adjusted for correct diameter with diamond laps. Every die is gauged over and over again using precision diamond bore gauges that use a 0.00005 inch minimum resolution and accuracy in a climate-controlled die works. All you have to do is push the seated core into the point forming die, eject it and see if the tip is closed as much as you like (or down to the same size as the ejection pin, as a minimum size). If you want to make a lead tip with a small point, the lead will extrude out the tip and form a pipe on the end. This is fine: it will be reshaped in the lead tip die. With care and practice you can use the lead tip die (LT-1) to help close the end of the bullet. A gentle nudge can close the tip as tightly as the two wall thicknesses allow.
Standard shapes of point forming dies are:
- 6-S Six caliber radius spizter for rifles up to .375 caliber, and for 50 BMG
- 4-S Four caliber radius spitzer for rifles above .375 caliber
- 3/4-E Three-quarter length elipse as round nose handgun
- TC Truncated Conical alternative handgun bullet shape
- 1-E One caliber length elipse as round nose rifle shape
- ULD Ultra Low Drag special purpose rifle 14-cal. secant design
Other shapes are available for a modest tooling charge to cover reamers, laps, and extra time required for testing and finishing non-standard designs.
LEAD TIP FORMING
 The lead tip forming die is never used by itself. It is a "clean-up" die, used to finish the lead tip after you have formed the ogive shape in the point forming die. A lead tip die is only needed when you want a small, rifle-style lead tip on a spitzer or other long nosed bullet. It isn't required for large round or flat tips, although it can be put to good use by making such designs more perfectly and consistently than you can by adjustment and technique along. In most pistol bullet designs the ogive is short enough so that the ejection pin of the point forming die will not affect the shape or finish enough to worry about. If you are extremely obsessive about the tiniest marks on the tip of the bullet, you might want to use the lead tip forming die to "clean up" the tiny marks left by the ejection pin. Practically speaking, the lead tip die is only needed badly when you want a nice sharp tip or a nice radiused spitzer (which we sometimes call a semi-spitzer tip).
 Lead tip dies are slightly larger in the bore diameter than the point forming die. The pressure used with them is so light that the bullet is not expanded under correct operating pressure. Only the lead tip is reshaped. However, the lead tip die does one other thing: it can help to make the shank of the bullet more parallel than it would be when formed in the point form die alone. This is because there can be a slight expansion of the solid base of the bullet as compared to the shank portion, on the order of 0.0001 to 0.0002 inches. The precision bore of the lead tip die can "iron" this slight base expansion back to the shank size. Whether or not it does depends on how closely it is mated to the diameter of the point forming die you are using. You can specify if you want to do this, or not. It is a matter of about a tenth of the thickness of a human hair.
Rebated Boattail (RBT-2)
 Rebated Boattail dies are optional for any 3-die set such as the FJFB-3, or for four-die lead-tip sets such as the LTFB-4. A rebated boattail is an angled base that is joined to the shank with a sharp shoulder, which acts as a "spoiler" to break up the muzzle blast gas so it will not flow over the base, follow the shank and nose, and form a ball of turbulence in front of the bullet. Up to 15 percent improvement in group size has been noted when using the RBT over a conventional boattail design, primarily because of this reduction in dispersement of the bullet due to muzzle blast.
The rebated boattail is formed on a normal jacket in two operations. First, for conventional thin walled drawn jackets, the lead core is seated in the jacket using the BT-1 die and a normal core seating external punch. This forms a conventional style boattail angle on the base of the bullet. The seated core and jacket are then placed in the BT-2 die and the same core seating punch is used to again apply pressure to the core. This forms the rebated boattail evenly and completely. If you try to skip the first die, you will find that more often than not you tear the bottom out of the jacket and make a terrible boattail! It takes both steps to do the job.
 The BT-1 has a smooth ogive and slightly smaller bore size. It is the first die into which you put the core and jacket, and expand the assembly. The goal is to produce a bullet with a tapered base on the jacket. The base will then fit past the shoulder in the second die (the BT-2) and can be expanded again to push the jacket against the shoulder in this die, thus forming the gas-deflecting rebated edge responsible for the superior accuracy of these bullets compared to a conventional boattail design.
 The BT-2 has a step in the ogive and a slightly larger bore size. It is the second die into which you put the core and jacket after they have already been expanded in the BT-1. This die forms the shoulder on the jacket by expansion "sideways" against the die wall.
Instead of using the regular flat-based punch to push the bullet into the point forming die, you would use a special punch with a cavity machined into the tip, which closely matches the boattail on the bullet. Do not use this punch for anything else! It is not designed to withstand pressure unless it is fully enclosed in the die. Making a bullet that is too heavy for the length of the die cavity results in the base of the bullet having pressure applied while the external punch is only partly supported inside the die cavity. This will instantly crack the punch and perhaps blow a piece of side-wall out of it. Make sure that the entire punch tip is well inside the die before it meets any resistance (resistance is what permits pressure to build). You will note that the core seating die has not been used in building a RBT bullet. You set this die aside and use it only for flat base (or cup or dish base) bullets. It is not only unnecessary, but will foil your effort to make a good bullet if you use it and then try to form the boattail base. Some die sets have both the regular CS-1 and the pair of RBT-2 dies. These sets are the FRBO-5 and the FRBL-6 combinations. The catalog number refers to the kinds of dies included in the matched set. You can build slowly toward any of these sets by starting with a FJFB-3 (Full jacket, flat base) set, and adding the lead tip (LT-1) and the rebated boattail (RBT-2) dies later.
We have begun making the RBT die set by using a BT-1 as usual, but using a tightly-fitted RBT punch inside the regular Core Seating die, instead of a stepped BT-2 die. This will work for most designs of bullets and jackets. In cases where it does not, we revert to the earlier method of using a BT-2 die with the lapped shoulder. The advantage of the newer method is that you can add a flat base internal punch and use the CS-1 die to make flat base bullets without the BT-1. Thus you get both flat and rebated boattail bullets by purchasing a set with RBT dies in it, and adding a single punch.
Lead Semi-Wadcutter (LSWC-1)
 The lead semi-wadcutter die is a single die that "does it all"! This single die combines the weight-adjusting ability of the core swage with the nose and base and final diameter forming ability of the core seater. In one quick stroke, you make a finished bullet ready to shoot. The only drawback to using this die is that it cannot make a smoothly curved ogive without a step or shoulder between nose and shank, and it cannot use a jacket except for a gas check, half jacket, or base guard (since a jacket would cover the bleed holes in the side of the die).
There are a number of bullets that are ideally suited to using the LSWC-1 die. These include:
- Hollow Base Lead Wadcutters
- Foster-type shotgun slugs (in -H dies, Hydro-Press)
- Hollow Base Airgun Pellets
- Gas-checked Semi-Wadcutters
- Half-jacketed Semi-Wadcutters
- Base Guard Semi-Wadcutters
- Any non-jacketed bullet with a shoulder between nose and shank
 The most important thing to remember about LSWC dies is that they will NOT curve the jacket, either to make bevel bases or to make any kind of ogival nose shape. They will make lead bullets with a shoulder, and can make short jacketed bullet provided the jacket does not cover the bleed holes, but if you want a full jacket of any sort, where the jacket curves, you need a core seater and point former. A lead smooth ogive bullet can be made using a core swage and a point former, since you don't need the core seater if you don't use any jacket.
 Paper Patched bullets are ideal for use with this die. The most popular shape of paper patched bullet is made in a LSWC-1 die having a 1-E ogive nose punch (external punch) and a cup base internal punch. This combination is nearly identical to the Sharps and Winchester/UMC bullets of the 1890 period, and give good accuracy in guns shooting the cartridges of that period. The most popular paper patched bullet die Corbin makes is the .45-70 caliber. In a jacketed swage die, the diameter for this caliber would be .458 inches. But for paper patched bullets, using 2.5 mil thickness paper wrapped twice around the bullet, the correct size of bullet (before patching) is .448 inches.
 The formula for determining the swage diameter for your paper patch bullet is to find out the groove to groove diameter of your bore (in a gun with .004 inch deep rifling, this would be the actual bore hole size plus .008 inches - a .300 bore with .004 rifling results in a .308 inch diameter for a jacketed bullet). This is the diameter you would normally use for jacketed bullets which fill the grooves. In a paper patched bullet, you would normally wrap the paper twice around the bullet and have it meet at a diagonal cut. The thickness of the paper you choose should be multiplied by four, and this product is subtracted from the groove-to-groove bore diameter (jacketed bullet diameter). The result is the proper size of swage die for a paper patched bullet.
There are other opinions, of course, as to the proper fit of bullet to the barrel, and in some cases they are correct for the particular gun. Some shooters prefer a more loose fit, where the base of the bullet is expanded by powder gas into the rifling and the bullet can be press fitted into the bore after patching. But in most cases, you will find good accuracy using the G-4X formula (groove-to-groove diameter is G, and X is the paper thickness you choose). Corbin makes the DC-1003 software which includes PPATCH.EXE, a program that quickly calculates the right bullet and patch combo for any barrel using any of the desired fits. This is only $10.
How to Swage Bullets