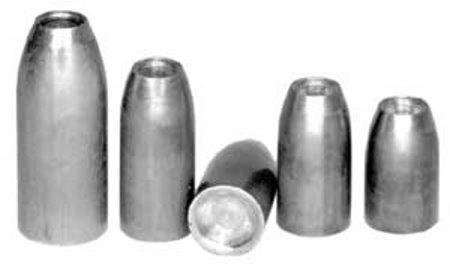
Corbin swage dies make air gun pellets (straight sided with a SWC nose) or two styles of air gun slugs. Straight sided pellets with a semi-wadcutter style nose can be made in a reloading press. Smooth ogive slugs require an actual swaging press, such as the Corbin CSP-1 S-press.

| All of the Corbin swage dies will make a wide range of weights by adjustment. When you order, you can indicate the lightest and heaviest weight you want to make, but all the dies will make just about any reasonable weight. To see prices or place orders, go to www.SwageDies.com secure web store. PELLETS Air gun "pellets" are made in a straight-hole die with a semi-wadcutter style nose, with straight sides. This is the LSWC-1-S catalog number. (Or -H for the larger presses.) That stands for "Lead Semi-Wadcutter" although the nose can be any of the standard SWC shapes listed, or even a custom shape. The die adjusts the weight with bleed holes to squirt off surplus lead. So one die will make almost any weight, by adjustment. The nose and base shape are formed against the ends of the internal and the external punches. These can be replaced with other optional shape punches. One LSWC-1-S pellet die can make any weight, in one diameter. You need a different die to change diameters. But you can change the shape of nose, and of the base, with different punches. The standard shapes are the TWC (Target Wadcutter), BWC (Button Nosed Wadcutter), Conical (comes to a point), 3/4-E (Elliptical round nose that is 3/4-calibers long), Keith SWC (which is a flat ended, angled cone cut off at about 40% of the width, and the TC (Truncated conical shape similar to the Keith style but longer and steeper angle). You can also order custom shapes of noses but reamers and laps have to be made, so there is an extra cost involved. Usually the most popular is the Keith nose or conical nose for air gun pellets. You can also order them with a hollow point but doing so means installing a rod through the punch axis, which adds some production cost. The standard base shape for pellets is the HB or Hollow Base. This too is just the shape on the end of a replaceble punch, so you can have other shapes with the same die. Others are the FB (Flat Base), DB (Dish Base - a shallow curved depression), CB (Cup Base, which is not nearly so deep as a hollow base but deeper than the dish base), and the RBT (Rebated Boattail Base). You can see all of these illustrated on the "DESIGN" page of this site. You can get a complete kit with everything required to start making pellets by ordering the KIT-1SP on www.SwageDies.com web store. SLUGS Air gun "slugs" are made in a die that has the nose shape diamond-lapped into the shape of the cavity of a point forming die. They look more like jacketed rifle bullets and do not have the step or shoulder of the SWC style pellet. They are "smooth ogive" style, with the straight "shank" portion blending smoothly into the curved nose or "ogive" section. There are TWO kinds of slugs: the "solid ogive" and the "hollow ogive". 1. SOLID OGIVE: The solid ogive is similar to the NSA type slugs. It can have a hollow point or a flat tip without a hollow point. The standard design has a 2-caliber tangent ogive radius, and a hollow point made in a standard depth, taper, and diameter for each standard diameter. Custom sizes, shapes and hollow point configurations are also available. There are several standard base shapes available. Most popular is the cup base. Others are dish, hollow, flat, and the RBT base. The catalog number for the Corbin solid ogive style of slug die is PF-1-SP. Then you just select the standard diameter and configuration or enter the custom specs you want. The diameter and shape are built into each die, so they can't be changed without getting a different die. The weight is an adjustment. The die bleeds off surplus lead to give you an exact weight. The base shape is formed by the external punch, so you can get other optional shapes easily. The hollow point shape and depth is formed by the tip of the ejector punch. You can also get other shapes for hollow points, but generally the standard design works best and is lower cost. You can get the complete solid ogive slug kit, everything you need, by ordering the KIT-2SP on the Corbin web store at www.SwageDies.com. 2. HOLLOW OGIVE The hollow ogive style looks similar to the solid ogive but is made in two dies, a hollow ogive preformer and the same point form die that makes the solid ogive. The hollow ogive preform die is a CSW-1-S core swage, which has the same base punch as the point forming die but a large hollow cavity-forming internal punch. 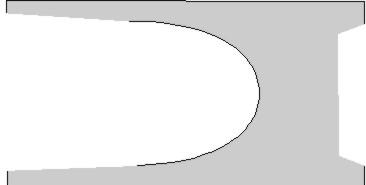 This kind of slug is similar to the FX Hybrid style. It can be made much lighter for the same length and caliber, since the entire inside of the nose is hollow, with the opening smaller than the inside. 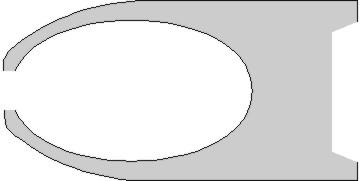 The second die, or point former, is only used to gently roll the "walls" of the hollow ended cylinder into the shape of the nose. It is NOT used to adjust the weight, since applying enough pressure to do that would collapse the hollow cavity. All the weight adjustment is done in the cylindrical pre-forming die. You can get a complete kit with everything you need to make the HO (Hollow Ogive) slugs by ordering the KIT-3SP on www.SwageDies.com, which is Corbin's secure shopping cart. Corbin makes air gun swage dies any caliber of air gun. The standard sizes and configurations are listed on this web site under the standards specs. A reloading press can be used to make the shouldered SWC style pellets, but not the smooth ogive slugs. In a reloading press, the SWC style is made in the PRO-SWAGE die. Select this to see SWC specs The smooth ogive style is made in Corbin swage presses with PF-1-SP and PF-1-HP type dies. Select this to see standard slug shapes/calibers. |
Using a Swaging or a Reloading Press? You can swage SWC type pellets in your reloading press or in any of Corbin's swaging presses. The advantage of using your reloading press is that you don't need to buy another press. But the advantage of using a swaging press is 300% faster production, greater precision, and less manipulation of the components and tools, plus ability to make smooth ogive slugs in one stroke (see Reloading Press versus Swaging Press for details). You can swage SWC type pellets in your reloading press or in any of Corbin's swaging presses. The advantage of using your reloading press is that you don't need to buy another press. But the advantage of using a swaging press is 300% faster production, greater precision, and less manipulation of the components and tools, plus ability to make smooth ogive slugs in one stroke (see Reloading Press versus Swaging Press for details). |
Using A Reloading Press In a reloading press, you can use the PRO-1-R PRO-SWAGE DIE. Select the underlined name to read about this kind of die. Remember, the same tool and procedure applies regardless of the caliber you choose. You use one die per caliber, of course, but we don't list the dies by caliber, we can make anything you want. When you order, specify the diameter. In a reloading press, you can use the PRO-1-R PRO-SWAGE DIE. Select the underlined name to read about this kind of die. Remember, the same tool and procedure applies regardless of the caliber you choose. You use one die per caliber, of course, but we don't list the dies by caliber, we can make anything you want. When you order, specify the diameter.The same die makes almost any weight, but you need to specify the minimum weight desired, the base style, the nose (ogive) shape, and the diameter desired. Weight is adjustable, but we can move the range to cover a different span depending on what you want. 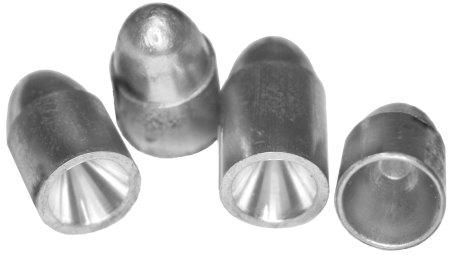 With a reloading press, the nose punch typically fits into the slotted ram. You can also precisely pre-adjust the lead core weight using a "weight-adjusting" punch, which is optional. Or you can just cut the core from lead wire, or cast the lead core from scrap lead, as close as possible and use that. It won't be quite as precise as if you extruded surplus lead using the bleed punch and then formed the nose, but it will work better than most factory pellets, which are banged around in a bulk container before you receive them. With a reloading press, the nose punch typically fits into the slotted ram. You can also precisely pre-adjust the lead core weight using a "weight-adjusting" punch, which is optional. Or you can just cut the core from lead wire, or cast the lead core from scrap lead, as close as possible and use that. It won't be quite as precise as if you extruded surplus lead using the bleed punch and then formed the nose, but it will work better than most factory pellets, which are banged around in a bulk container before you receive them.You may want to include the optional "weight adjusting punch" which is a bleed-hole punch, allowing you to pre-adjust the core weight before forming the pellet. This gives you greater weight control and precision, but is not absolutely necessary for good pellets. In the Corbin swage presses, the dies have built-in weight adjustment which takes place as the pellet is formed, saving one step and one additional component. This design is not practical with a reloading presses, since the die fits into the press head and is surrounded by the threads, right where the bleed holes would need to be located! ...So here's what you would order (specify any caliber .104 to .580):
|
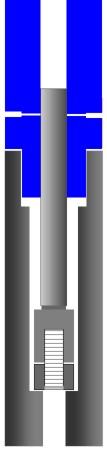
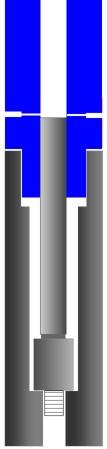
Swaging Press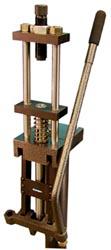 Pellets of .458 or smaller diameter can be formed in the CSP-1 S-press with -S type dies (1-inch OD body, 5/8-24 shank). Most people shooting spring-air guns will find the CSP-1 press with -S type dies to be exactly what they need, since the calibers are typically under .458 diameter. Pellets of .458 or smaller diameter can be formed in the CSP-1 S-press with -S type dies (1-inch OD body, 5/8-24 shank). Most people shooting spring-air guns will find the CSP-1 press with -S type dies to be exactly what they need, since the calibers are typically under .458 diameter.Pellets larger than .458 can be formed in the CSP-2 Mega Mite or the Hydro Press, with -H type dies (1.5-inch OD body, 1-12 threaded shank). Both the CSP-2 hand press and the CHP-1 Hydro Press are capable of 50 caliber, even up to 20mm. 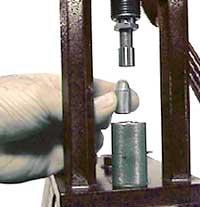 A single-diameter pellet of adjustable weight can be swaged in a LSWC-1-S die. This die fits into the ram of the CSP-1 press. It forms the base with an internal punch that also ejects the bullet from the die on the down stroke, and the nose is formed in a cavity in the end of the external punch. The edge of the punch forms a small shoulder, which gives this kind of bullet the general classification of "semi-wadcutter", regardless of the actual shape of the nose projecting beyond this shoulder. A single-diameter pellet of adjustable weight can be swaged in a LSWC-1-S die. This die fits into the ram of the CSP-1 press. It forms the base with an internal punch that also ejects the bullet from the die on the down stroke, and the nose is formed in a cavity in the end of the external punch. The edge of the punch forms a small shoulder, which gives this kind of bullet the general classification of "semi-wadcutter", regardless of the actual shape of the nose projecting beyond this shoulder.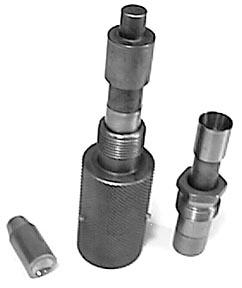 This kind of pellet has proven itself in international competition at the highest levels, provided the diameter is matched correctly to the chamber and the skirts are the proper thickness for the air pressure at the muzzle. The nose, base, weight, and diameter are all precisely formed in one stroke, with surplus lead bleeding through holes in the side of the die. Simply adjusting the top or external punch holder up and down controls the weight. Changing either the base (internal) or nose (external) punch will create a different base or nose shape. Hollow points can be formed with a custom punch which has both the nose cavity and a probe or HP forming rod mounted through a central hole in the punch. The base can be flat, dished, cup, hollow, rebated boattail, or special custom shapes as desired. This kind of pellet has proven itself in international competition at the highest levels, provided the diameter is matched correctly to the chamber and the skirts are the proper thickness for the air pressure at the muzzle. The nose, base, weight, and diameter are all precisely formed in one stroke, with surplus lead bleeding through holes in the side of the die. Simply adjusting the top or external punch holder up and down controls the weight. Changing either the base (internal) or nose (external) punch will create a different base or nose shape. Hollow points can be formed with a custom punch which has both the nose cavity and a probe or HP forming rod mounted through a central hole in the punch. The base can be flat, dished, cup, hollow, rebated boattail, or special custom shapes as desired.Here is the complete package you would need for SWC type pellets of a given diameter, up to .458 size:
If you wish, you can replace the lead wire and core cutter with the CM-4a core mold, and your own supply of soft lead. See Prices Pellets larger than .458 diameter: If you wish to make pellets or slugs larger than .458, then you will need the larger diameter -H type dies which fit the CSP-2 Mega Mite press, or the CHP-1 Hydro Press. Of course, these presses and -H dies can also be used with smaller diameters. The operation is the same as with the -S type dies and CSP-1 press. Here is the complete package you would need for pellets of a given diameter, over .458 size (up to 20mm):
|
Smooth ogive slugs: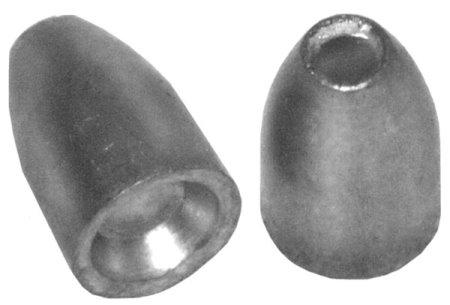
 Airgun pellets with a smooth ogive are usually called "slugs". They can also be swaged using two different methods (in addition to the two different presses depending on caliber). Standard hollow point and solid tip slugs can be made in the same die by changing the ejector punch. The tip of the punch changes the tip shape of the slug. A projection on the end of the ejector creates hollow point. Making the punch flat on the end creates a flat meplat (bullet tip).
- Two-Die System
The first method is to use a CSW-1 core swage die to create a precise cylinder of lead for the core, bleeding off surplus material to leave an exact weight on each stroke. Then this core is put into a PF-1 point forming die, which has a smooth ogive or nose shape diamond lapped into the die cavity itself.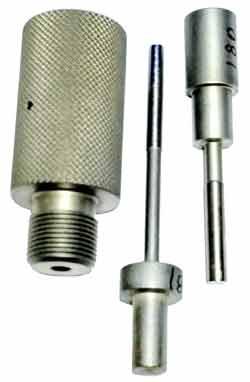 Since there is no "nose punch" per se (only a small ejection punch), there is no need for a shoulder on the bullet nose. The conventional PF-1-S or PF-1-H die has a spring-wire ejection pin to poke the bullet out by the tip, on the down stroke, but it leaves a somewhat uneven tip. The pressure-sealing ejector of the PF-1-SL or PF-1-HL die seals pressure and allows the tip to be finished against the end of the ejector punch. Ejection is automatic and greatly speeds up the operation: the bullet simply rises out of the die as the ram is retracted.
 - Single-Die System
A second method uses a PF-1-SP or PF-1-HP version of the standard PF-1-S or PF-1-H point form die. This "P" version does it all in one stroke! It is the same die as the PF-1-SB or PF-1-HB but more specific to making air gun projectiles. It has bleed holes to extrude surplus lead and adjust the weight, it forms the base and the nose at the same time as it expands the core of lead to full diameter, and it has a pressure sealing, honed ejector punch fitted to a precisely sized ejection pin hole in the die. Standard diameters, shapes and HP specifications.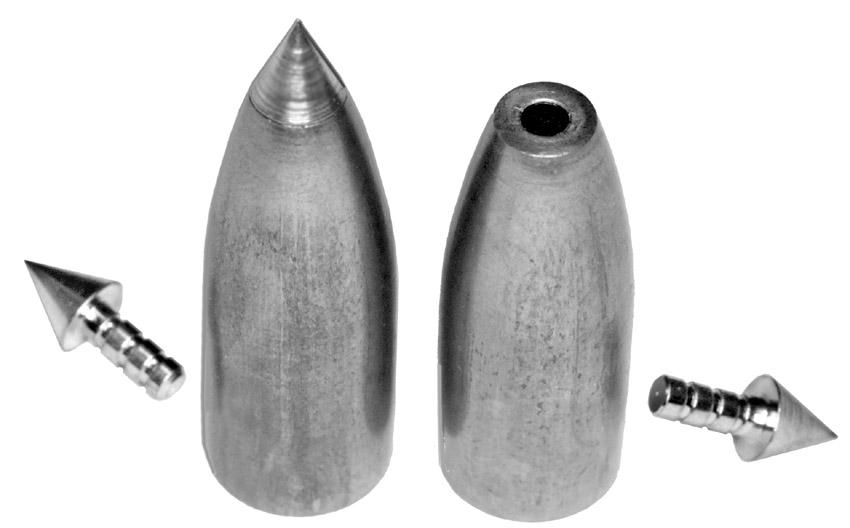 Metal tip inserts for high BC can be made using the PF-1-ST (or PF-1-HT) metal tip insert dies. These dies ONLY make slugs that have a specific ogive shape to blend with the tip, and they ONLY make slugs that are larger than about 30 caliber. They work best with 375 to 50 caliber size (.45 is ideal). In the smaller calibers such as .25, .22, and 5mm the metal tip insert is not practical.
Note:
The same instructions and details apply to both -P and -L versions of the bleed-hole sync punch point forming dies. The -L code is there to indicate a general purpose die for black powder, shotgun slug, lead pistol bullet, etc., rather than specific use in making air gun slugs (we used "P" because initially, the slugs and pellets were all called pellets, but soon the terms separated to mean specific designs).
This pressure sealing ejector must be synchronized in length to the precise depth of the die cavity, which will vary slightly with the hand lapped die cavity in each die. A number marked on the die and on the punch head specifies the exact length, so that the die maker can replace the punch or the die without having to receive the old one back for measurement and syncronizing (which means adjusting the punch length so it comes exactly flush with the end of the die cavity).
The short-hand term "sync" is used to indicate on order forms that the punch is synchronized and pressure sealing fit to its die. A sync punch usually has a larger diameter ejector than a normal spring-wire ejector, and can be used to create a flat tip or a hollow point.
Having a projection on the tip, a little smaller than the rest of the punch, will form a hole in the tip of the bullet. So you can, in one quick stroke, make a smooth ogive lead bullet with any sort of base design (flat, cup, dish, etc.) and adjust the weight, and create a hollow point cavity. All these operation might take several steps if used in separate dies, so the value of the custom PF die can not only save time, but may also be less expensive than several separate components.
The only caveat is that the sync punch is absolutely necessary to allow pressure build up sufficient to do all this in one stroke, so it adds the slight additional requirement of keeping track of exact punch length, not mixing a sync punch made for one point form die with another one made for a different die, and always telling the die maker the sync number (or numbers) written on the die and punch when ordering a replacement. The ejection pin itself is removable from the punch head, so that you can replace damaged punches without having to buy the entire punch, just the PUNCH-HI or PUNCH-SI (which means, punch Insert).
Obviously, if you opt for the PF-1-SP or PF-1-HP for making slugs you do not need a CSW-1-H core swage. But, you can use one first to pre-form cores if you wish. The advantage may be, in some shapes and designs, that the ends will be more smooth or the edges less likely to have lube voids, etc. Don't worry too much about that unless it happens, because normally, it won't. Because people want all sorts of unusual designs for hollow points and nose and base shapes, there are some cases where the flow of material is such that it traps lube or otherwise doesn't want to fill out as well as usual. In those cases, pre-swaging the core can be the solution.
Hollow Ogive Slugs
It is also possible to make a hollow ogive slug which can be the same shape and length as a reglar HP slug, but considerably lighter. This is done in two steps, using a CSW-1-S or CSW-1-H core swage die first, with a large hollow point punch, then the PF-1-SP (or -HP) die to finish the ogive shape. The ejector punch needs to be one that is long enough to reach the bottom of the cavity, rather than pushing on the meplat.- CSW-1-S or CSW-1-H core swage die.
This die sets the weight, and makes the base shape, while forming a huge open nose cavity. The slug looks like a cylinder at this stage. - PF-1-SP or PF-1-HP point form die.
This die rolls the nose or ogive shape around the huge cavity, leaving the ogive hollow. A longer than usual ejection punch is required (provided if you get the set together, added if you are adding the core swage to an existing standard hollow point PF die).You can use the same die, with a different ejector punch, to make normal hollow point slugs (or solids) without the core swage "pre-forming" step.
The set of two dies with proper ejector, press, lead wire, core cutter, and lube can be ordered as the complete KIT-3SP. The KIT-1SP has the LSWC-1-S die for shouldered pellets, and the KIT-2SP has the PF-1-SP die for smooth ogive slugs. These can be seen on www.SwageDies.com web store under the "Air Gun Swage" heading.
You may observe that the hollow ogive style and the regular smooth ogive made using two dies is essentially the same setup (two dies, a core swage and point former). The point form die can be a PF-1-SL (or -HL) OR it can be the PF-1-SP (or -HP) for either, and the core swage is the same CSW-1-S or CSW-1-H. The main difference is the punch used in the core swage die. With regular solid ogive slugs, the punch end for the "nose" is flat. With the hollow ogive slug, the punch has a fairly large projection, usually rounded and slightly tapered. The base punch can be the same shape as the final slug base, or it could be flat.
Generally it is better to use the PF-1-SP die for versatility, and the PF-1-SL die for lower cost. The difference is the use of bleed holes in the PF-1-S version, so that the die could optionally be used to make the solid ogive slug by itself. The PF-1-SL has a pressure sealing, synchronized punch, but no bleed holes. It doesn't adjust the core weight. Using an optional flat nose punch in the core swage die means that the combination of core swage and point form could be used for either solid or hollow ogive slugs. It's a mix and match situation, with considerable versatility. - CSW-1-S or CSW-1-H core swage die.
Pellet and Slug Design Notes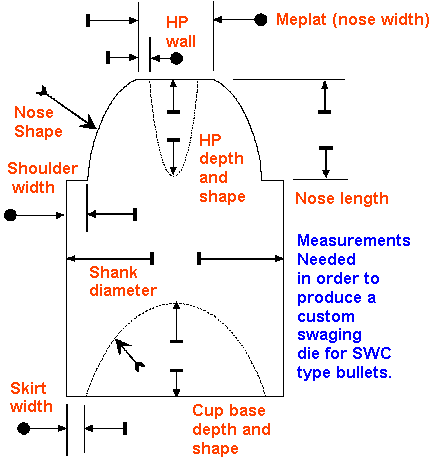 Years of providing equipment for world-class competitors to make precision standard caliber air gun projectiles have proved that a simple, straight-sided pellet with hollow base can be the most accurate and reliable design (in higher pressure hunting/defense air guns, the base may be flat, cupped, or dished rather than hollow). The two factors of greatest importance for small bore pellets or lower pressure guns are: Years of providing equipment for world-class competitors to make precision standard caliber air gun projectiles have proved that a simple, straight-sided pellet with hollow base can be the most accurate and reliable design (in higher pressure hunting/defense air guns, the base may be flat, cupped, or dished rather than hollow). The two factors of greatest importance for small bore pellets or lower pressure guns are:
In order to immediately obturate (seal) the air pressure at the instant of firing, the diameter needs to be very close to that of your gun's chamber. Because the base is hollow, with "skirts" of a carefully designed thickness for the available pressure, the pellet will expand and seal in the bore. Actual matching the bore size is far less important than fitting the chamber, for this reason. If the pellet is too large, it will be hard to insert and may be deformed from the seating pressure. If the pellet is too small, air will escape around it before it can expand fully, giving poor fit to the rifling. When it is sized for a mild press fit into the chamber, it will seal well and utilize all the available pressure for propulsion down the barrel and for expansion into the rifling grooves. Therefore, the first thing to discover is the diameter of your chamber. If you have an existing pellet that fits well, measure it and use that diameter. Or, place a lead cylinder or pellet in the chamber, and use a flat-ended cleaning rod tip on a cleaning rod to compress the pellet and expand it to a good fit, then measure it. If you are concerned about your ability to measure accurately, send five or six sample pellets to Corbin. One pellet might be slightly "off" or get damaged in the mail. Five or six will give us enough to take an average and come up with a useful number for the new die diameter. Skirt Thickness 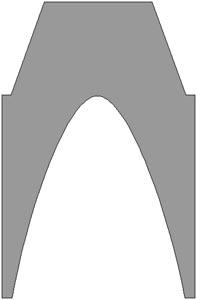 The skirt thickness is the dimension measuring the flange or wall thickness around the hollow cavity in the base. This is typically the thickness of just one side, so that a .222 diameter pellet with a hollow cavity that is 0.192 in diameter at the base would mean a skirt thickness of 0.222 minus 0.192 equals 0.030 inches remaining, divided by 2 equals a skirt of 0.015 inches. The skirt thickness is the dimension measuring the flange or wall thickness around the hollow cavity in the base. This is typically the thickness of just one side, so that a .222 diameter pellet with a hollow cavity that is 0.192 in diameter at the base would mean a skirt thickness of 0.222 minus 0.192 equals 0.030 inches remaining, divided by 2 equals a skirt of 0.015 inches.(Again, not ALL pellets need a hollow base. Very high pressure PCP guns may do fine with a flat, dish, or cup base instead. But spring-air and lower pressure guns generally need the expansion potential of the hollow base to produce a good pressure seal and get all the available energy while still engaging the rifling properly.) Skirt thickness has to be carefully balanced so that the skirt is strong enough NOT to be torn off or damaged from passage through the bore, thin enough to expand instantly when hit by the release of compressed air in the chamber, and thick enough so that it will not expand as the pellet exits the muzzle. This means you may want a different skirt thickness for different kinds of air guns, and even for different barrel lengths. A spring-air piston gun might use a skirt of only 0.010 to 0.015 inch thickness. This is a fragile edge, not suitable for bulk packaging, which needs to be carried in a container with multiple holes in a foam insert so the pellets are not deformed. The pellets also need to be seated with a seating tool to avoid pushing on the thin edge (a seating tool typically fits into the base cavity and pushes inside it, rather than at the edge).  A pre-charged compressed gas gun might use a skirt of .020-.035 inch thickness, depending on the pellet weight and barrel length (and the pressure level). This is not "written in stone" but simply an example. You can tell if a skirt is too thin if the skirt is left in the barrel, or if the pellet expands at the base as it exits the barrel. This will give poor accuracy. Recovering a few pellets fired into Sim-Test or other ballistic gel or water will show expanded skirts. Making the skirt thicker eliminates these problems. You can tell if the skirt is too thick because the velocity will drop due to lack of a good seal, and accuracy will suffer due to lack of expansion into the bottom of the rifling grooves. Too thick a skirt is generally less harmful than too thin, if the pellet fits the chamber properly. A pre-charged compressed gas gun might use a skirt of .020-.035 inch thickness, depending on the pellet weight and barrel length (and the pressure level). This is not "written in stone" but simply an example. You can tell if a skirt is too thin if the skirt is left in the barrel, or if the pellet expands at the base as it exits the barrel. This will give poor accuracy. Recovering a few pellets fired into Sim-Test or other ballistic gel or water will show expanded skirts. Making the skirt thicker eliminates these problems. You can tell if the skirt is too thick because the velocity will drop due to lack of a good seal, and accuracy will suffer due to lack of expansion into the bottom of the rifling grooves. Too thick a skirt is generally less harmful than too thin, if the pellet fits the chamber properly. | |||
Additional Items: Here are some of the things you probably will need to go with the dies and/or press: Here are some of the things you probably will need to go with the dies and/or press:
 | |||
| Solution to Incomplete Tip or Base Formation With thin skirts and sharp edges on the nose, especially in light weight hollow base pellet designs, it is possible that the pressure needed to flow lead into the narrow spaces within the die will be relieved through the weight-adjusting bleed holes in the die. This can lower the pressure below the point needed to make a nice, sharp edge or a complete finished base with a smooth, even edge. If you are having this issue with a specific design, one solution is to get a special pellet swage internal punch, which has a removable nut on the tail end. This punch will sit higher in the die with the nut attached, blocking the bleed holes so that lead pressure will be able to rise and fill out the pellet edges and base. The nut unscrews so that the punch drops further into the ram, exposing the bleed holes. Then the same die can be used both as a core swage, to adjust the core weight with the nut removed, and as a core seater, with the nut installed, to block the bleed holes. This will work if the pellet length and weight is small enough so the space left in the lead semi-wadcutter die, with the bleed holes blocked by the internal punch, is still long enough to hold the complete pellet and a caliber or two length of the external punch (for alignment). Usually, an air gun pellet is relatively short compared to its caliber, so this will work. It does not work for any bullet that is longer than a caliber length less than the distance from the bleed holes to the die mouth.
To order this special punch, order an internal punch for the desired caliber (PUNCH-SC 220 INT LSWC, for instance). Then add the words "Adj.Bleed Hole Blocker". This is a "custom" punch which is not usually in stock, but it can be made to order rather quickly. | |||
Other Information... Shotgun Slugs are different from air gun pellets primarily in their weight and diameter, but not so much in their general design and tools. You can make a .410 shotgun slug even in a reloading press or the S-press. You can make 20 and 12 gauge slugs in the Corbin Hydro Press (and, with some effort, in the large CSP-2 Mega Mite hand press) using -H type dies. Viewed from a distance, the shotgun slugs would look similar to air gun pellets and vice versa! Shotgun Slugs are different from air gun pellets primarily in their weight and diameter, but not so much in their general design and tools. You can make a .410 shotgun slug even in a reloading press or the S-press. You can make 20 and 12 gauge slugs in the Corbin Hydro Press (and, with some effort, in the large CSP-2 Mega Mite hand press) using -H type dies. Viewed from a distance, the shotgun slugs would look similar to air gun pellets and vice versa!If you would like to make dual diameter pellets, or pellets without the small SWC shoulder caused by using a nose punch (the edge of the punch can't be zero thickness, and that's what forms the little SWC shoulder), it can be done using other special dies. But in general, the best results and lowest cost, easiest operation and highest production is with the straight sided, SWC-shoulder style of pellet, which is very much like a match pistol bullet except for the particularly thin skirts and hollow base depth. In fact, the same tools are used to make hollow base pistol bullets, with a different diameter swage die but the same LSWC-1-S, LSWC-1-H, or PRO-SWAGE style having a somewhat thicker skirt and shorter hollow cavity in the base. You can order directly on www.SwageDies.com secure web store by clicking the "padlock" symbol at the top of nearly all web pages. CORBIN PO Box 2659, White City, OR 97503 USA |


| Home Page | Price List | E-Mail Sales | Site Map | New Products | Q&A | Terminology |
| Retirement | Specials | Real Estate | Software | How to swage | Classified Ads | Feedback |
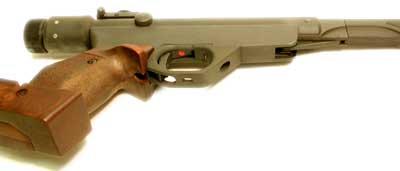
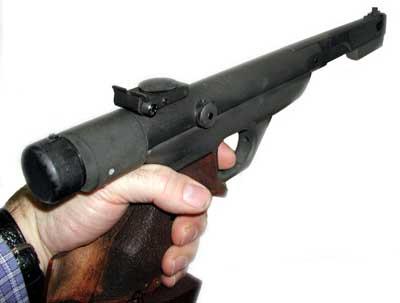
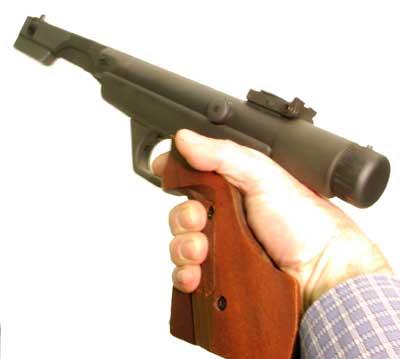
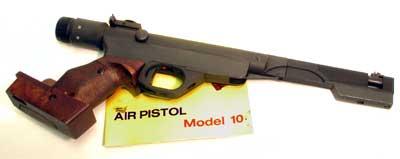
| The Diana Model 10 used two pistons, one moving backward to cancel the momentum of the main piston compressing air behind the pellet, resulting in virtually no spring/piston recoil. The trigger could be adjusted for position, overtravel, pretravel, and two levels of trigger force. Both the front are rear sight had click adjustments. The front sight adjusts for profile width, and the rear for windage and elevation. The "barrel weight" is a rotating grip that covers the sights and forms a handle, used to "break" the barrel downward to cock the gun. The gun cannot be fired until this cover is rotated back under the barrel, after cocking. At 30 meters, the gun could put five 177 caliber pellets into a single ragged hole (the same might not always be said for the shooter). |
Start writing here...
Ready to Make Your Own PCP Airgun Slugs?
The Corbin S-Press Airgun Slug Kit gives you everything you need to swage world-class PCP slugs at home — the same equipment used by competition champions worldwide.
Shop the S-Press Airgun Slug Kit →
About Corbin Air Gun Slug Swaging