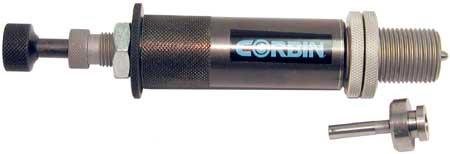
The Pro-Swage system utilizes a special reloading press die (7/8-14 tpi) with punches that fit into a normal RCBS slotted ram. The die comes with one standard base and one standard nose punch. It can be ordered with your choice of other nose punches for different shape noses. Base punches include Base Guard base (BG), flat base (FB), hollow base (HB) or a cup base (CB) punch, depending on whether the caliber is for paper patched bullets or full bore size bullets.
An often-ordered extra punch is the weight adjusting or "bleed" punch, which is an external punch with a special bleed hole to extrude lead and adjust the weight precisely, before changing to the regular external punch and finishing the bullet. Just order the "PUNCH-RW, Pro-Swage External Wt.Adj" and specify the diameter of the bullet. |
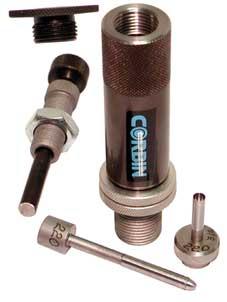
 The Pro-Swage internal punch can be removed by unscrewing the top nut and bushing, and removing them from the die body. The punch can be replaced with other shapes, such as flat, dish or cup for jacketed or lead bullets, Base Guard style, Rebated Boattail or Hollow Base for lead bullets. The maximum bullet length can be adjusted for lighter or heavier bullets by adjusting the bushing at the top of the die up or down, to position the internal punch closer or further from the die mouth (for lighter or heavier bullets). The Pro-Swage internal punch can be removed by unscrewing the top nut and bushing, and removing them from the die body. The punch can be replaced with other shapes, such as flat, dish or cup for jacketed or lead bullets, Base Guard style, Rebated Boattail or Hollow Base for lead bullets. The maximum bullet length can be adjusted for lighter or heavier bullets by adjusting the bushing at the top of the die up or down, to position the internal punch closer or further from the die mouth (for lighter or heavier bullets).Above is a disassembled .218 diameter pellet swage die for .22 Airgun. Note the hollow base internal punch. |
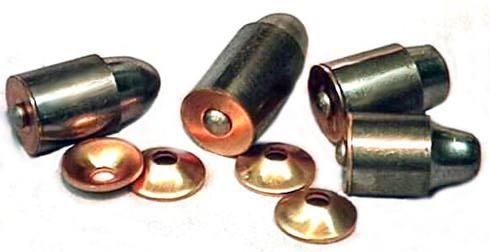
| Lead wire is available in 70,000 grain spools, and you can cut it to precise length with the Pro-Swage core cutter (PCS-3). The core cutter slices lead wire easily into adjustable lengths, and thus sets the weight of the bullet. You can set the length with a stop screw, which adjusts the length of wire to be cut off. The wire passes through two holes in the tool, and rests against the stop screw. Moving the long padded handle cuts off the desired weight of lead wire. One end of the cutter mounts to your bench. Gently guiding the lead wire down while cutting it results in very fast production of cut cores (typically 1000 or more per hour). Lubricate the lead lightly using Corbin Swage Lube, which is a clean, clear natural lubricant that withstands very high pressures without diesel effect (detonation under pressure). Most lubricants used in reloading will detonate at very high pressure, and swaging uses pressures above the diesel point of most oils. The quantity used is so small that there is no danger to the operator, but detonation results in nothing but ash instead of a film of lubricant, and causes hard ejection and excess wear on the dies. Using the proper lubricant eliminates this problem, and makes swaging practical for home use. The lubricant is applied simply by touching the lubricant and picking up the lead "cores" (cut pieces), and giving them a slight twist between the finger and thumb before inserting into the die. No special tools or elaborate techniques are required: a simple, natural action of handling the material will apply a sufficiently thick film to lubricate the swaging operation.  Instructions come with the die, but swaging is so simple that the best information is gained by experimenting. All that is necessary is (1) cut a piece of lead wire to the weight you want for your bullet, and (2) with a little lube on your fingertips, pick up the core and put it into the die, and then (3) adjust the die so that you can squeeze the bullet firmly but without much effort using the end of your press stroke. Eject the bullet by tapping on the knock-out rod (at the top of the die) using a plastic, leather or wood mallet. (Even a six to eight inch length of wood works for this.) Instructions come with the die, but swaging is so simple that the best information is gained by experimenting. All that is necessary is (1) cut a piece of lead wire to the weight you want for your bullet, and (2) with a little lube on your fingertips, pick up the core and put it into the die, and then (3) adjust the die so that you can squeeze the bullet firmly but without much effort using the end of your press stroke. Eject the bullet by tapping on the knock-out rod (at the top of the die) using a plastic, leather or wood mallet. (Even a six to eight inch length of wood works for this.)Examine the bullet and see if it is filled out completely. If not, you need to adjust the die slightly up or down, to give you either more leverage at the end of the stroke, or a little more "reach" to contact the bullet more completely. You'll quickly learn by doing it. Perfect bullets are the result of proper adjustment, which will be self-evident. Small adjustments, with examination between each one, will serve as the best instruction of all. To apply a Base Guard, first swage the bullet gently to form a flat end, then eject it (even if it isn't completely filled out on the nose or base yet). Set a Base Guard disk on top of the bullet (which is upside down, with the nose pointed down and the base pointed up toward the die). The pointed or conical tip of the Base Guard disk should be facing the bullet. Gently raise the bullet and disk up into the die, which as the Base Guard punch inside it. (The Base Guard punch has a dimple or depression exactly in the center, to form a rivet and hold the disk in place). |
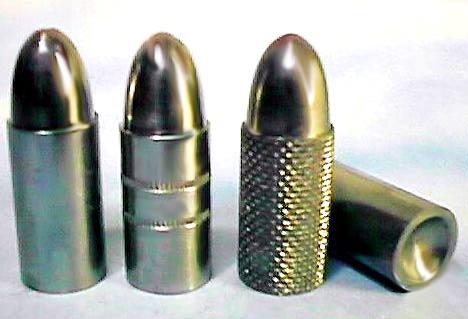
Any size may be ordered, in the range of .218 to .58-inch diameter. The concept of a complete swaging kit with everything you need in a single package, for a given diameter of bullet, including supplies, makes the decision to try bullet swaging easy and fool-proof: you can't get it wrong because everything you need is here! Everything from hollow based airgun pellets to .410 shotgun slugs, paper patched .458 bullets to 3/4-jacketed .45 ACP's, can be made using the appropriate diameter of Pro-Swage die.  Bullets made using the simple, one-stroke Pro-Swage system are of the SWC style. That is, they will have a shoulder of about .015 to .020 inch width between the nose and the straight shank portion of the bullet. This is necessary because the nose is formed in a cavity formed in the end of the nose punch, and the edge of this punch must be of sufficient strength to withstand being moved while tons of pressure press outward against the die wall. If the edge of the punch cavity were any thinner, it would simply pull apart under the pressure required to form and then eject the bullet, leaving a ragged edge of about the same thickness. Bullets made using the simple, one-stroke Pro-Swage system are of the SWC style. That is, they will have a shoulder of about .015 to .020 inch width between the nose and the straight shank portion of the bullet. This is necessary because the nose is formed in a cavity formed in the end of the nose punch, and the edge of this punch must be of sufficient strength to withstand being moved while tons of pressure press outward against the die wall. If the edge of the punch cavity were any thinner, it would simply pull apart under the pressure required to form and then eject the bullet, leaving a ragged edge of about the same thickness.In order to make bullets with no shoulder between the nose and shank, a different system is required that uses two dies. The first die is a cylindrical style, like the Pro-Swage, having two fitted punches into a straight hole. This kind of die can generate very high pressures to flow the lead into an accurate cylinder, with or without hollow point or base cavity formed by the punch shapes. It can also extrude surplus lead from one or more "bleed" holes to adjust the core weight precisely. The second die has a bullet shaped, diamond-lapped cavity just slightly larger than the bore of the first die. It is called a "point forming" die. The straight cylinder from the first die is pushed into this second die, curving the end smoothly to match the die shape. At the tip of the point forming die is an ejection pin, which pushes the bullet back out when it is finished forming. The pin is typically from .070 to .150 inches in diameter, depending on the bullet diameter and force needed to push it out without bending the pin or penetrating into the bullet material. The Point Forming die is available in dies built for Corbin presses, which can automatically retract and hold the ejection pin out of the die cavity while the bullet is forming, and then gently but powerfully push the pin down and eject the bullet. The Pro-Swage system is designed as a simple and low cost method for making accurate bullets with a very wide range of weights in a single die. Point forming dies are not made in the Pro-Swage system. If you want to make bullets that have no shoulder between nose and shank, select a set of dies from the type -M, -S, or -H family of Corbin Swage Dies. You will need at least two dies for lead bullets, or three for jacketed bullets. The two for lead bullets normally will be the CSW-1 core swage die, to adjust the core weight, or the very similar LSWC-1 lead semi-wadcutter die which is like a core swage made to final diameter and fitted with nose and base punches, plus a PF-1 point forming die with a bore about .001 inches larger than the first die, to allow for easy insertion and ejection of the bullet. The PRO-SWAGE die can also make a 3/4-jacket handgun bullet, a gas-checked bullet, or a half-jacketed bullet. The only kind it cannot make is an ogival type bullet without a step. For that, you will want a Corbin press and 3-die set.  Nose shapes at right are: TWC, BWC, Conical, Keith, Auto Loader (AL), 3/4-E, and 1-E SWC. Optional punches include HP and Weight-adjusting (bleed hole) punch. Nose shapes at right are: TWC, BWC, Conical, Keith, Auto Loader (AL), 3/4-E, and 1-E SWC. Optional punches include HP and Weight-adjusting (bleed hole) punch. |
| Punches included with the Pro-Swage Kit depend on the caliber. You can order special punches from Corbin. The standard sizes and shapes are:
A recommended optional punch is the weight-adjusting external punch. This punch has a flat end, and a bleed hole through the punch. To adjust the weight precisely, insert the piece of lead core material in the die and set the position of the die so that you bleed off a small amount of lead through the punch, when the press ram is raised all the way to the top. |
Just like owning a thousand different bullet moulds, for every weight you can imagine, with various nose and base shapes that can be combined for unlimited effects (apply one punch shape followed by another, with different insertion depths, to achieve hundreds of different shapes and effects!). No heat, no molten lead dangers: just fast, precise, unlimited variety in your personalized bullet designs and weights. There has never been a better time to try bullet swaging! |
CORBIN |
Start writing here...

About corbin Pro-Swage Die